
This page explains how to navigate the RARE web portal.
You’ll learn how to access core features, understand the main navigation, and see how permissions and payment tiers shape your experience.
Overview
The RARE platform is part of a wider IVD system used to capture, manage, analyse, and report lateral flow assay results. It supports both field and laboratory workflows and is designed to reflect the characteristics of the IVD system and how it is used in practice.
The mobile app is used at the point of testing to scan assays and upload results, together with relevant contextual information. The web portal is the primary workspace for authorised users to manage organisations and accounts, configure tests, review and analyse data, explore “what if” scenarios, and generate diagnostic reports.
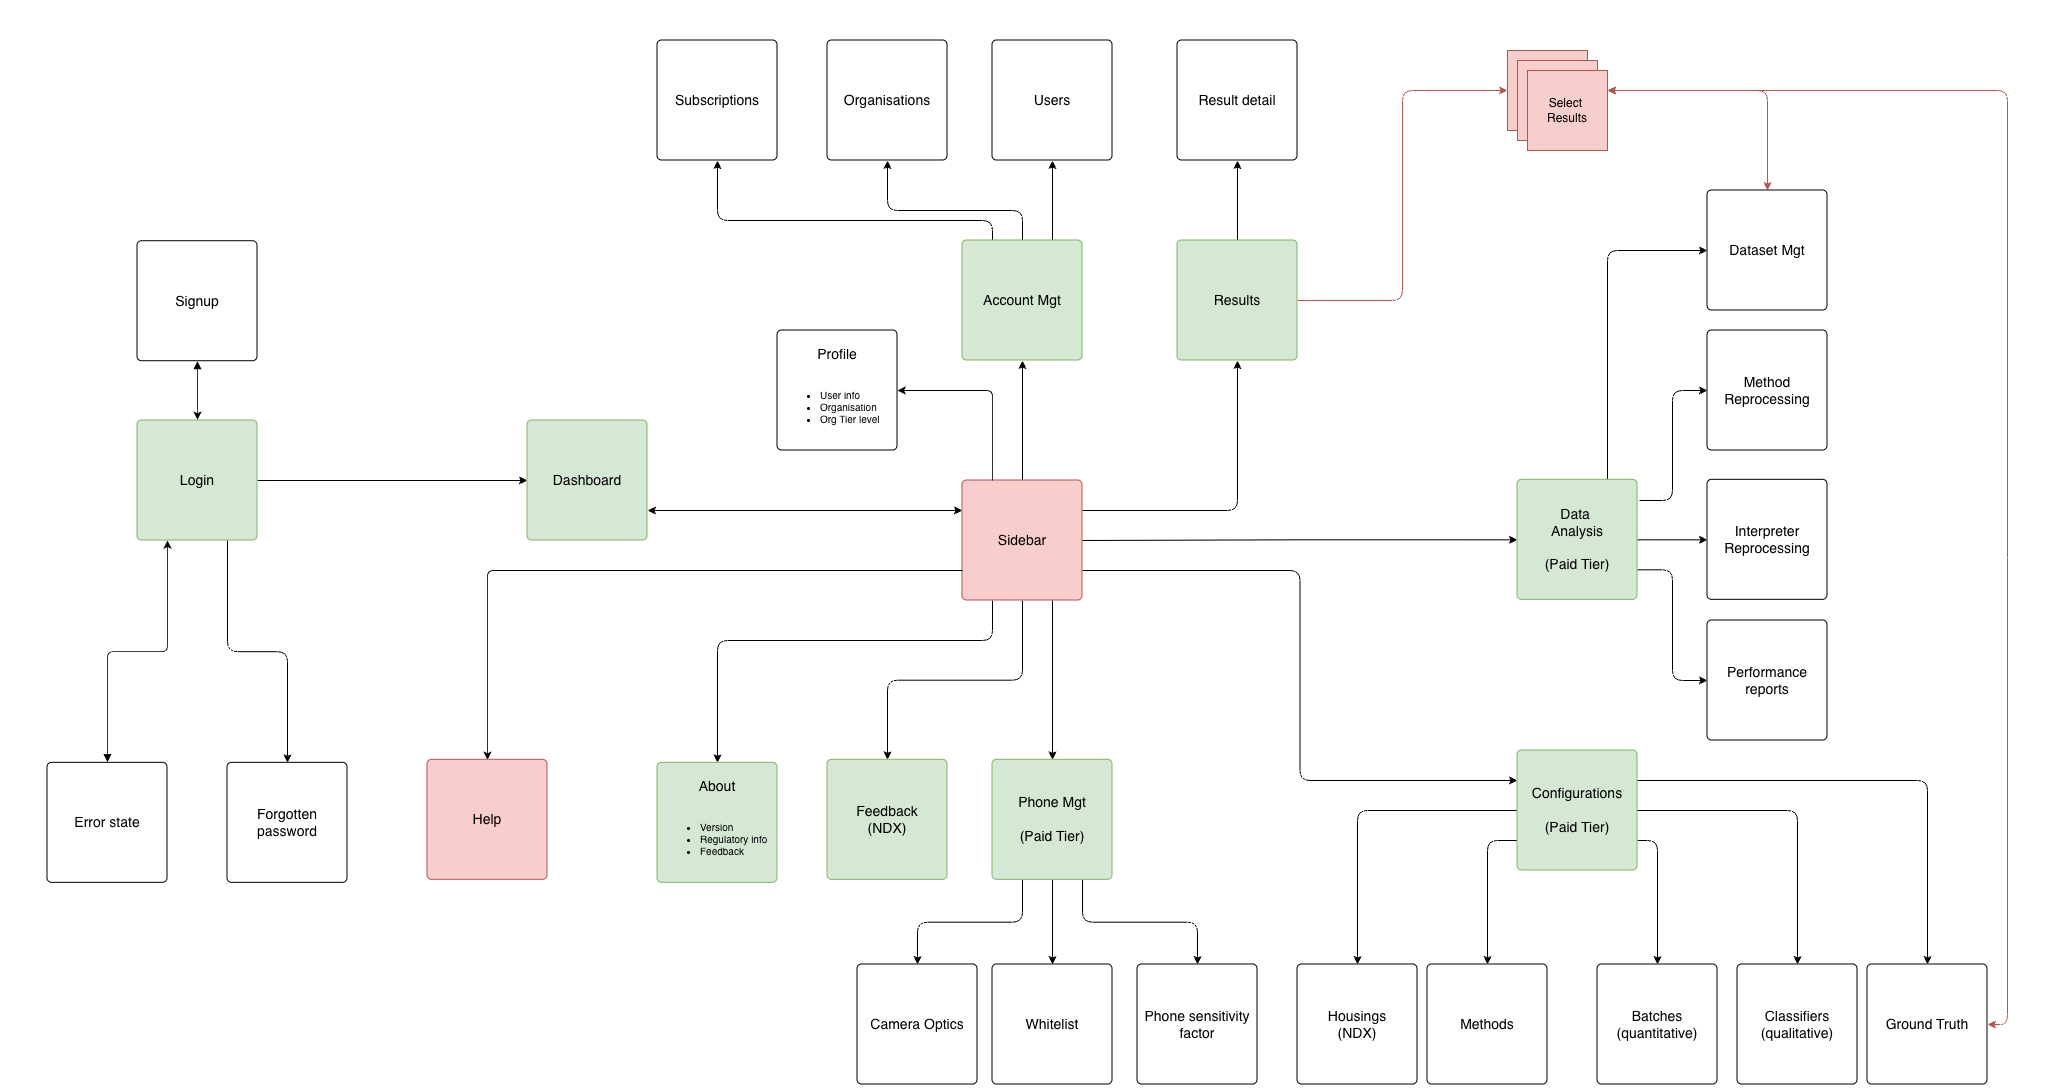
This screen flow shows how the main areas of the RARE web portal connect to each other:
-
Login → Dashboard → Sidebar: All users start at login, move to the Dashboard, and then use the sidebar as the primary way to reach other parts of the portal.
-
Core features: From the sidebar you can reach Results, Account Management, Help, and other shared features that are available to all users.
-
Paid‑tier areas: Data Analysis, Configurations, and Phone Management are highlighted as paid‑tier features. These unlock additional tools such as dataset management, method and interpreter reprocessing, performance reports, and device configuration.
You do not need to memorise this diagram, but it provides a high‑level map of how the portal is organised and how paid features extend the core workflow.
Navigation in the web portal is role- and subscription-aware.
What you see and can do is determined by your assigned permissions and your organisation’s subscription tier, so that users only access the functions they are authorised to use within the overall RARE system.
Where to find it
The main navigation in the RARE web portal is designed to make it easy to reach the tools you need to fulfil your responsibilities in the overall RARE system (from result capture through to analysis and reporting).
Web portal access
Open the RARE web portal in your browser and sign in with your account. The main navigation will appear either on the left-hand side or across the top of the screen, depending on your device and window size.
Navigation sidebar
After you log in, you land on the Dashboard. From there, the navigation sidebar is always available so you can quickly move between results review, datasets, methods, reports, user management, and settings.
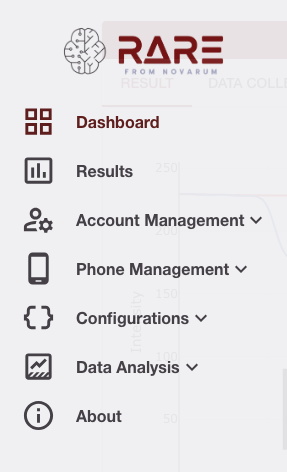
Role- and subscription-aware menus
The options you see in the navigation reflect your assigned role (Admin, Org Admin, Standard User) and your organisation’s subscription tier (Free or Paid). Only features that are available to your role and subscription are shown, helping you focus on the tasks you are authorised to perform within the RARE platform.
Key Concepts
These terms are used throughout this page and in the child pages that describe individual features:
-
Sidebar navigation: The main navigation panel listing all available features (e.g. Dashboard, Results, Datasets, Methods, Reports, Users, Settings). Each item opens a dedicated page.
-
Dashboard: The landing page after login, giving a high-level view of recent activity and shortcuts into common tasks.
-
Role-based access: Your assigned role (Admin, Org Admin, Standard User) determines which menu items and actions are available to you.
-
Subscription tier: Some advanced areas of the portal (for example, certain Data Analysis and Configuration tools) are only available on paid subscriptions.
-
Mobile vs web: The mobile app focuses on capturing and uploading results at the point of testing; the web portal focuses on data management, analysis, configuration, and reporting.
Step-by-step: How to navigate the platform
-
Log in
-
Open the RARE web portal in your browser and sign in with your credentials.
-
Two-factor authentication may be required for extra security.
-
-
Explore the sidebar
-
The sidebar appears on the left (or across the top on smaller screens).
-
Menu items represent major features (e.g. Dashboard, Results, Datasets, Methods, Reports, Users, Settings).
-
Select any menu item to open its dedicated page.
-
-
Access feature pages
-
Each sidebar menu item opens a feature page with its own tools and workflows.
-
Child pages in this documentation provide detailed guides for each feature.
-
-
Use mobile and web for the right tasks
-
Use the mobile app to scan assays and upload results in the lab or field.
-
Use the web portal for data management, analysis, configuration, and reporting.
-
What’s included in Sidebar?
Menu items represent major features, each with its own page.
Additional menu items will be documented under this section as they are introduced.
After you’ve done this
-
You’ll know how to find and access every feature available to your role and subscription.
-
For detailed instructions on each feature, visit the corresponding child page from the sidebar or documentation menu.
-
If you’re missing features, check your role or subscription, or contact your admin.
Tips
-
Bookmark the portal URL for quick access.
-
Hover over sidebar icons for tooltips if labels are hidden.
-
Check your role if you can’t see a menu item you expect.