
Overview
The RARE mobile app is part of a wider IVD system used to capture, manage, analyse, and report lateral flow assay results. It is designed for use at the point of testing, in both field and laboratory environments, and to reflect how the overall IVD system is used in practice.
The mobile app focuses on secure result capture and upload. It guides users through scanning tests, entering any required contextual information, and submitting results to the RARE platform. The web portal is then used by authorised users to review, analyse, and report on those results, and to manage configurations and accounts.
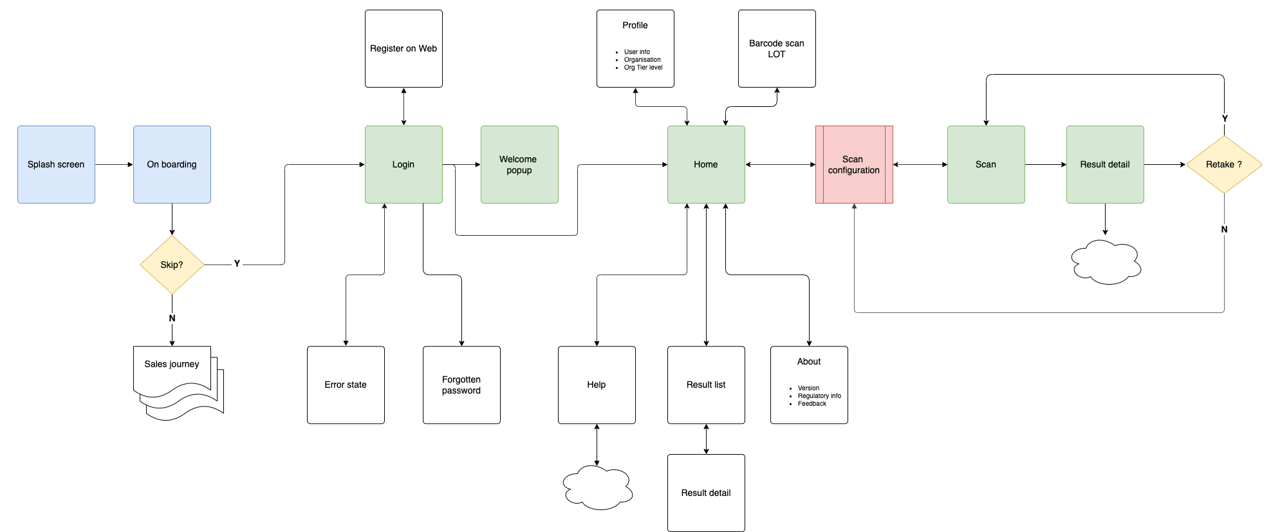
This screen flow shows how the main areas of the RARE mobile app connect to each other:
-
App launch → Login → Home: Users open the app, authenticate (if required), and land on the home or dashboard screen, which acts as the central navigation hub.
-
Core testing workflow: From the home screen, users start or continue test runs, scan assays using the phone camera, add any required metadata, and submit results.
-
Supporting screens: Additional screens (such as Settings, Help, or Account/Profile) support configuration, troubleshooting, and user management within the app.
You do not need to memorise this diagram, but it provides a high‑level map of how the app is organised and how the main testing workflow fits with supporting screens.
Navigation in the mobile app is kept simple and focused on the tasks needed at the point of testing. What you see and can do may also depend on your assigned role and your organisation’s configuration in the RARE platform.
Where to find it
The RARE mobile app is installed on supported smartphones and is used where tests are performed (for example, at the point of care or in the laboratory).
-
Install and open the app: Install the RARE mobile app from your organisation’s approved app store or deployment mechanism. Open the app from your device’s home screen.
-
Sign in (if required): Depending on how your organisation is set up, you may need to sign in before you can scan or upload results.
Once you are signed in:
-
Home / dashboard screen: After launch and login, you land on the main home or dashboard screen. From here you can start new tests, access recent activity, and reach other parts of the app.
-
Bottom or side navigation (if present): Some app versions provide a bottom or side navigation bar to move quickly between key sections (for example, Home, Tests/Results, and Settings).
-
In‑flow navigation: During a test, the app guides you step‑by‑step (for example: scan test → confirm details → add metadata → review → submit). Buttons and prompts on each screen lead you through the workflow without needing to navigate manually.
Key concepts
These terms are used throughout this page and in the child pages that describe individual mobile app features:
-
Home / dashboard: The first screen after launch or login, providing access to start new tests and view recent or pending activity.
-
Test workflow: The guided sequence of screens used to capture a result (for example: select test or assay, scan, confirm, add context, submit).
-
Scanner / camera view: The screen that uses the phone camera to capture images of the test device for analysis.
-
Pending / queued uploads: Results that have been captured on the device but not yet uploaded to the RARE platform (for example, due to connectivity issues).
-
Settings: Screens where users can adjust app-level preferences and see information about the app version and configuration, as allowed by their organisation.
-
Mobile vs web: The mobile app focuses on capturing and uploading results at the point of testing; the web portal focuses on data management, analysis, configuration, and reporting.
Step‑by‑step: How to navigate the mobile app
-
Open the app
-
Locate the RARE mobile app on your device and tap to open it.
-
If required by your organisation, complete any login or authentication steps before proceeding.
-
-
Start from the home screen
-
After launch or login, review the home or dashboard screen.
-
From here you can start new tests, resume any in‑progress workflows (if supported), and see recent or queued results.
-
-
Follow the test workflow
-
Select the appropriate option to begin a new test or scan.
-
Follow the on‑screen prompts through each step of the workflow (for example: select test type or method, prepare the device, scan, confirm lines or values, add metadata).
-
Use the on‑screen navigation buttons (Next, Back, Cancel, Submit) to move between steps.
-
-
Review and submit results
-
At the end of the workflow, review the captured image(s) and recorded information.
-
Confirm and submit the result so it can be uploaded to the RARE platform.
-
If the device is offline or upload fails, the result may be kept in a pending or queued state until connectivity is restored.
-
-
Access supporting screens
-
From the home or navigation bar, open any available supporting screens such as Settings, Help, or Account/Profile.
-
Use these areas to check app information, adjust allowed options, or find guidance, as configured by your organisation.
-
After you’ve done this
-
You’ll understand how to move through the main mobile app screens and complete a full test workflow from launch to result submission.
-
You’ll know where to find supporting screens (such as Settings or Help) if they are available in your deployment.
-
For detailed instructions on specific mobile features or workflows, refer to the corresponding child pages in this documentation.
Tips
-
Keep your app up to date: Ensure you are using the latest approved version of the RARE mobile app distributed by your organisation.
-
Check connectivity: If results remain in a pending or queued state, check your device’s network connection and reopen the app to trigger upload.
-
Follow on‑screen prompts: The app is designed to guide you step‑by‑step; read each prompt carefully, especially when scanning and confirming results.
-
Use web portal for follow‑up: Once results are uploaded, use the RARE web portal to review, analyse, and report on data as required by your role.