
|
Novarum DX Ltd
|
Document ID: IFU032
|
Use Camera Optics Management when you need to control how supported phones capture images in RARE—ensuring consistent, validated image quality across devices and housings.
What is Camera Optics?
This page explains how to manage Camera Optics configurations in the RARE web portal. You’ll learn how to create, edit, and assign optics profiles to phones and housings, supporting robust calibration, validation, and traceability for your lateral flow assay workflows.
Camera Optics configurations define how each supported phone captures images for a given housing. This ensures that image capture is consistent, reproducible, and validated—critical for reliable assay interpretation and regulatory compliance.
Camera Optics works together with:
-
Phone Management – which phones are supported
-
Methods – which Housing and Camera Optics pair is used when capturing images
You usually don’t change Camera Optics frequently. Instead, you:
-
Create or select an appropriate optics profile
-
Attach it to the right phones
-
Then choose that optics profile in your Methods
Accessing Camera Optics
-
Log in to the RARE Portal as a paid user.
-
In the left-hand menu, go to Phone Management → Camera Optics.
-
The Camera Optics list page opens.
Understanding the Camera Optics list
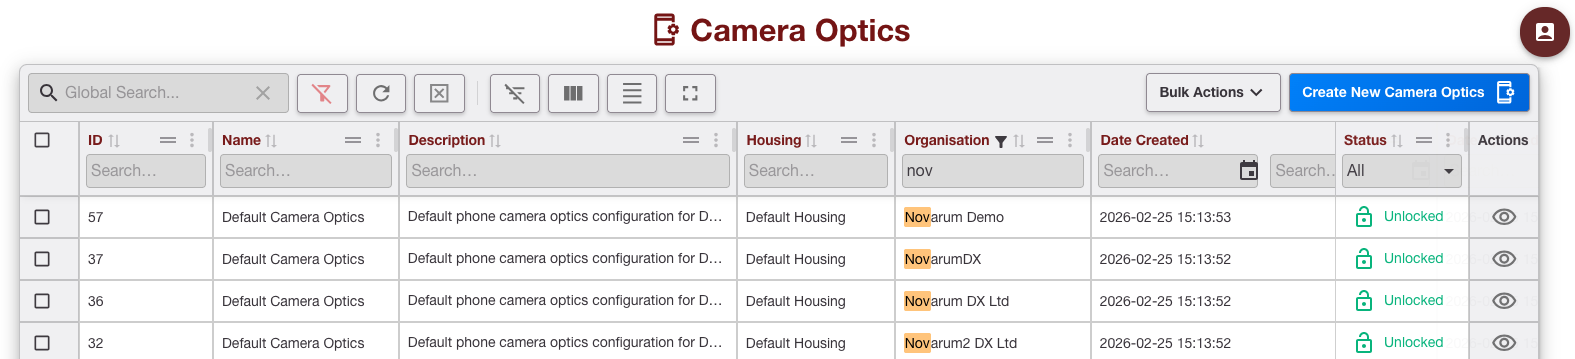
The Camera Optics list shows all optics profiles that have been defined.
Each row represents a single Camera Optics configuration.
Typical columns include:
-
Name – The name of the optics configuration (e.g.
Default Camera Optics). -
Description – Short text describing how or where this configuration is used.
-
Housing – Which assay Housing is linked to this configuration.
-
Date Created / Date Updated – When it was first created and last changed.
-
Actions – Options to view or edit the configuration.
Use this list to check:
-
If a profile exists for a particular phone/housing.
-
Which housings share the same optics profile.
-
When a profile was last updated.
Filtering and sorting Camera Optics
If you have many Camera Optics entries, use filters and sorting to find the right one.

Filter
At the top of the list you may be able to:
-
Search by name – Type part of the optics configuration name.
-
Filter by phone / model (if available) – Show only optics profiles linked to a particular phone.
If you see no results, clear or relax your filters.
Sort
Click on a column header (for example, Name or Updated) to sort the list in ascending or descending order. This helps to:
-
Bring the most recently updated profiles to the top
-
Group similar names together
Actions available
Each row has an Actions menu or buttons. Common actions are:
-
View / Edit – See the details of the optics configuration, and / or Change the optics configuration.
Creating a new Camera Optics configuration
Step 1 – Basic details
-
On the Camera Optics list page, click Create New (or Create Camera Optics, depending on your UI). The Create Camera Optics screen opens.
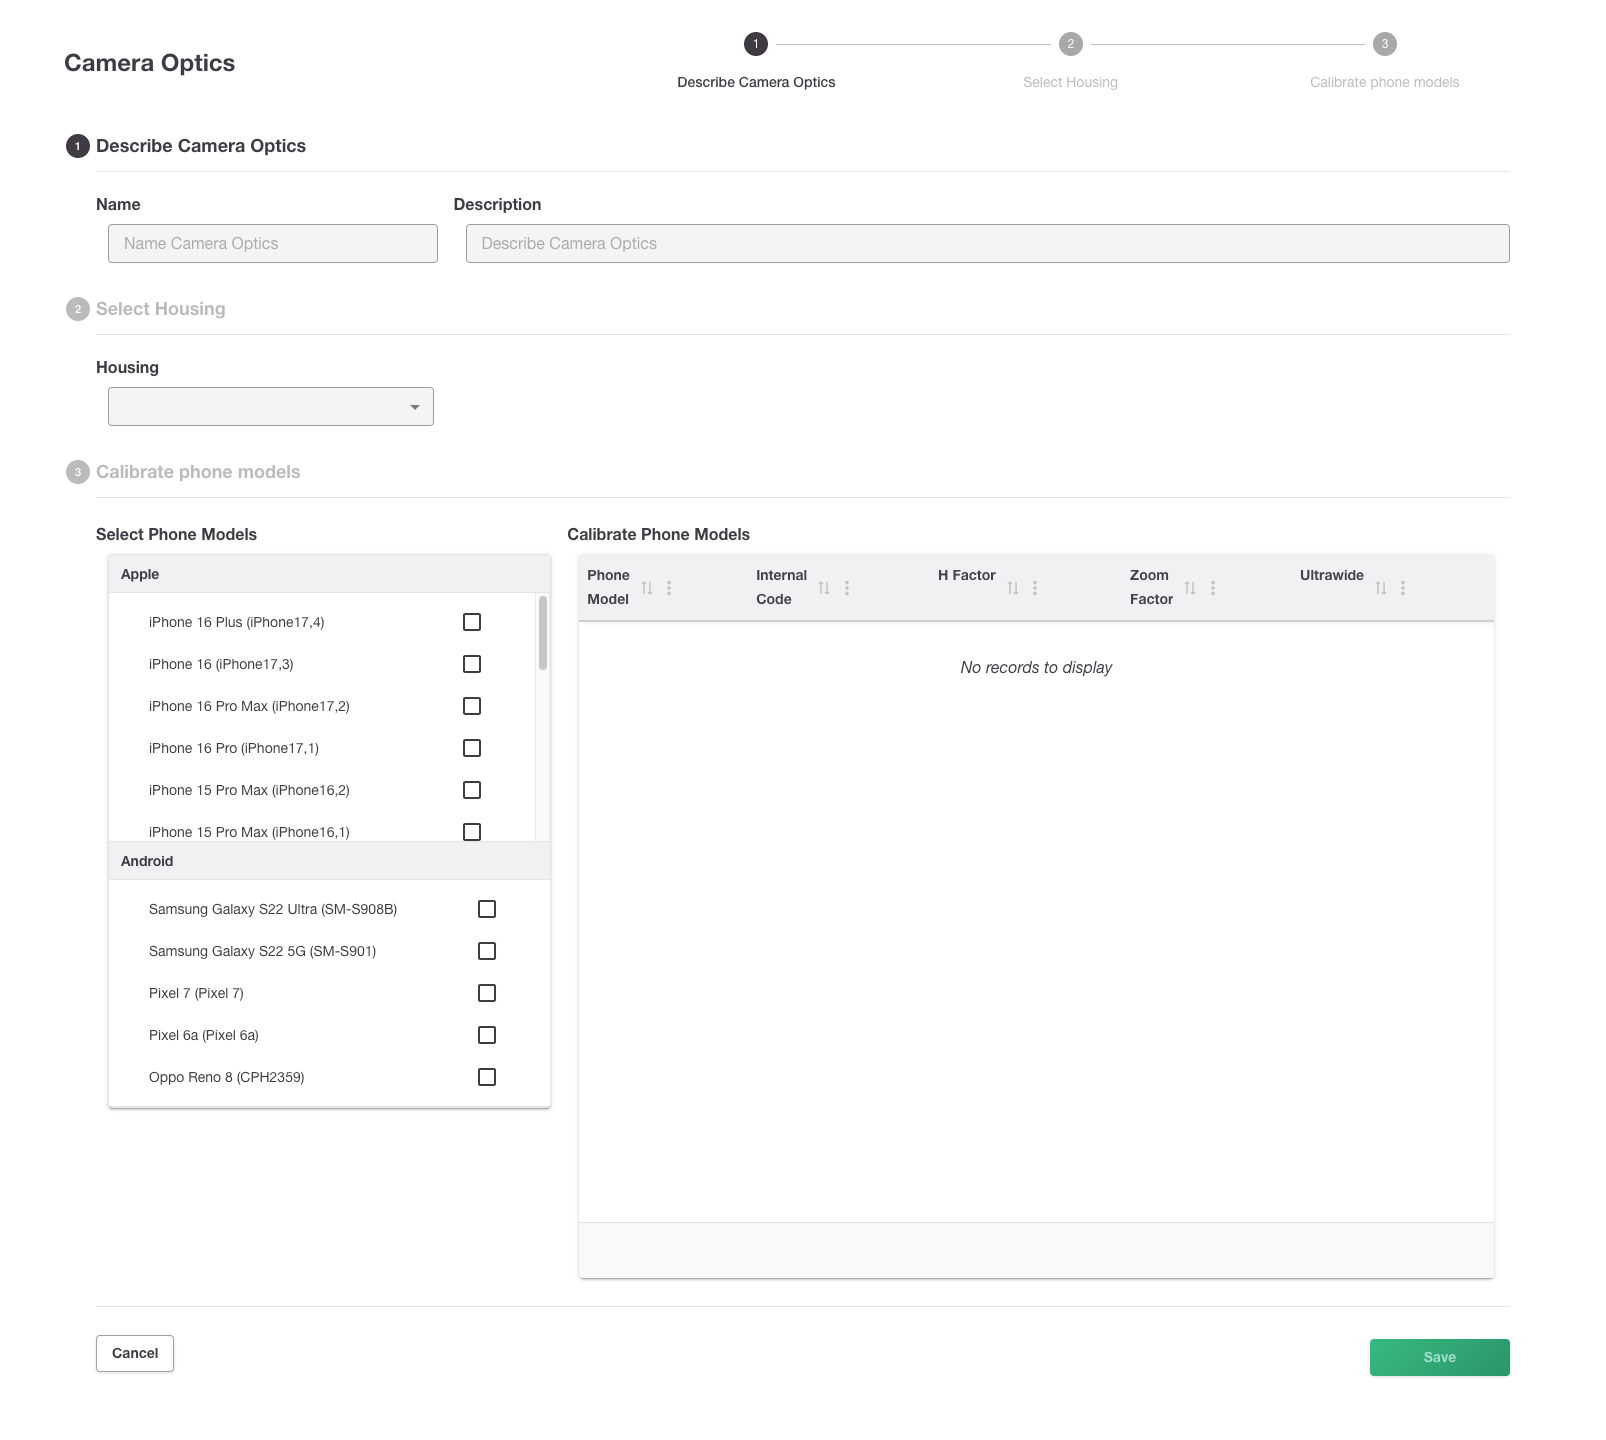
Enter the basic information:
-
Name
-
Enter a clear, descriptive name.
-
-
Description
-
Briefly describe how or where this profile is used.
-
Example:
Default optics configuration for Hourglass Housing
-
These names and descriptions will appear later when selecting Camera Optics in Methods.

Best practice
-
Use clear names
Include the Housing and a short hint (e.g. “Standard”, “High‑light”) so other users can select the right profile confidently. -
Align with Methods
When you create or edit a Method, select the Camera Optics profile that matches how the phone was used during development and testing.
Step 2 - Select Housing
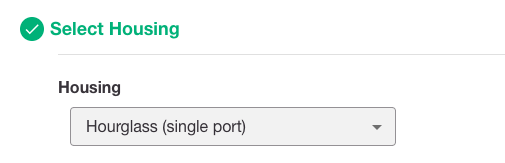
Each Camera Optics configuration must be linked to a Housing. This tells RARE which physical test Housing this optics profile was designed and validated for.
-
Click the Housing dropdown.
-
Scroll to search for the correct Housing name (for example,
Hourglass Housing, etc.). -
Click the Housing that matches how this optics profile was developed and tested.
If you can’t see the Housing you expect:
-
Make sure the Housing has already been created in Configurations .
-
If a required Housing is missing or unclear, contact your RARE administrator or the person responsible for Housing setup.
How to choose the right Housing
Pick the Housing that matches:
-
The physical device to be used when you characterise the optics (e.g. tray shape, window size, guide rails).
-
The assay format your Methods will use with this optics profile.
If you are unsure:
-
Check the Method or validation documentation for the intended Housing name.
-
Ask your internal assay / validation owner which Housing should be used.
Important:
Linking a Camera Optics configuration to the wrong Housing can lead to poor image capture or incorrect results, because the optics will not match the physical layout of the test. Only change this setting if you understand the impact on existing Methods.
Step 3 – Calibrate phone models
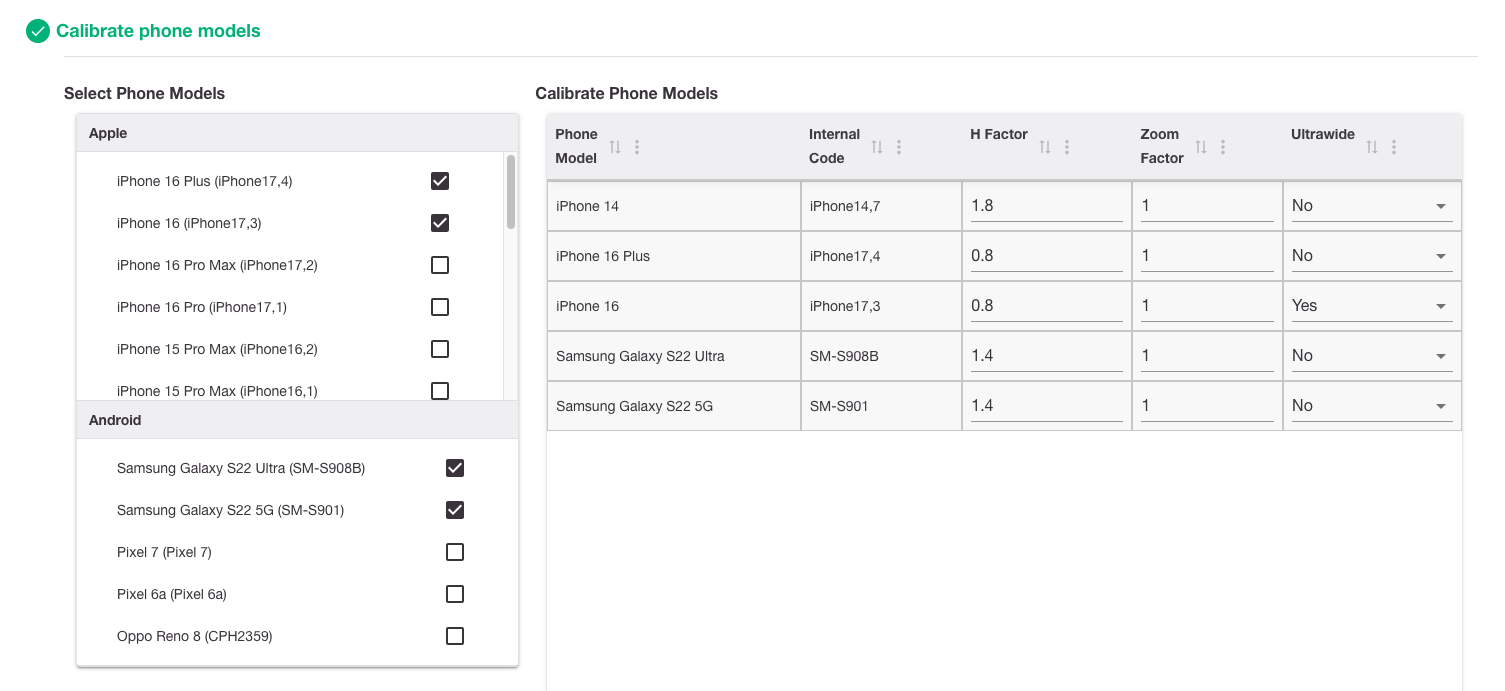
Use this step to choose which phones will use this Camera Optics configuration, and to fine‑tune how each phone captures images (zoom, H factor, ultrawide).
Select phone models
This panel shows a checklist of phone models or phone families which is maintained by your RARE administrator.
To select phone models:
-
Tick the checkbox next to each phone model that should use this Camera Optics configuration.
-
As you tick items, the Calibrate phone models table below is updated to show one row per selected phone.
If you don’t see a phone model you expect:
-
The phone model might not have been added yet by your RARE administrator.
-
If a required phone is missing or incorrectly named, contact your RARE administrator to update the phone list.
Tip:
Avoid “over‑selecting” phones just in case. Only include phones that have actually been checked against this optics profile..
Calibrate phone models
After you select phone models, the Calibrate phone models table appears with one row per phone.
Typical columns:
-
Phone model – The user‑friendly name for the phone (for example,
iPhone 14,Samsung Galaxy S22). This is the name you will normally recognise and select. -
Internal code – The manufacturer or internal model identifier (for example,
iPhone14,7). The manufacturer or internal model identifier (for example,iPhone14,7). This is used to align with result information sent from the RARE app, which retrieves this code from the phone during use. -
H factor – Overrides the default H factor from the Method (if set).
-
Zoom factor – Scales how much the camera is zoomed when capturing images.
-
Ultrawide – Yes/No: whether the phone should use the ultrawide camera instead of the main camera.
Use this table to tweak how each selected phone captures images for this Camera Optics profile.
Per‑phone settings
|
Setting |
What it does / how to set it |
When to change it |
When to leave it blank / unchanged |
|---|---|---|---|
|
H factor |
Per‑phone adjustment that can override the H factor defined in the Method.
|
|
|
|
Zoom factor |
Controls how much the camera image is zoomed when capturing tests.
|
|
|
|
Ultrawide (Yes / No) |
Tells RARE whether to use the phone’s ultrawide camera instead of the main camera.
|
|
|
When to adjust these values (and when not to)
You should adjust H factor, zoom factor or ultrawide when:
-
You are performing a formal calibration or validation for a new or updated phone.
-
You have evidence from test images that a specific phone needs a small correction to match other phones.
-
You are adding a phone to an existing optics profile and need to bring its behaviour into line.
You should avoid changing these values when:
-
The phone performs acceptably in production and there is no validation data to justify the change.
-
You are not responsible for optics / camera calibration.
-
The change has not been assessed under your change‑control / validation process.
Important:
Any changes in this table can affect how results are captured and interpreted for the selected phones. Treat updates as part of your normal validation or change‑control process, and record changes where required.
Step 4 – Save
-
Check that the Name and Description are clear and correct.
-
Check that the correct Housing is linked.
-
Check that the correct phones are selected and have appropriate settings applied.
-
Click Save.
You are returned to the Camera Optics list, and the new profile appears in the table.
Viewing and editing an existing Camera Optics configuration
To review or update a Camera Optics profile:
-
From the Camera Optics list, find the entry you want.
-
Click View to open and Edit to make changes.
Make any necessary edits, then click Save.
Note: Changing a Camera Optics configuration affects any Methods that refer to it.
If this is part of a validation or change‑control process, record your change in your usual documentation.
Enabling or Disabling a Camera Optics Profile
Profiles are always available for selection in Methods unless disabled.
Permissions and Visibility
-
Only users with appropriate roles can create, edit, or delete Camera Optics profiles.
-
All actions are logged for audit and compliance.
After You’ve Done This
-
The Camera Optics profile is available for use in Methods.
-
All changes are traceable; previous versions can be reviewed for audit.
-
Consistent image capture is ensured across supported phones and housings.