
|
Novarum DX Ltd
|
Document ID: IFU038
|
Use this when you need to manage, review, or update the qualitative classifier rules that determine how your assay results are interpreted in the RARE Portal.
What is Qualitative Classifier Configuration Management?
This guide shows you how to view, create, edit, and manage qualitative classifier configurations in the RARE Portal. You’ll learn how to filter and sort classifiers, preview their logic, and enable or disable configurations as needed for your QC and validation workflows.
Qualitative classifiers are essential for defining how your lateral flow assay results are interpreted—ensuring consistency, traceability, and regulatory compliance.
The Qualitative Classifier Configuration Management page lets you:
-
See all threshold-based rules used to classify assay outcomes (e.g., positive/negative, multi-bin).
-
Filter and sort classifiers to quickly find the right configuration.
-
Preview the logic for each classifier, including control/test line thresholds.
-
View, edit, enable, or disable classifier configurations—all from one place.
This supports rapid updates, validation, and troubleshooting without disrupting your original data or workflows.
Classifier Configuration Management
Managing your qualitative classifier configurations is a key part of ensuring your lateral flow assay results are interpreted consistently and reliably.
In the RARE Portal, the Classifier Configuration Management section gives you a clear, central place to review, update, and control the rules that define how your assay outcomes are classified—whether you’re working with simple positive/negative results or more complex multi-bin schemes.
Accessing Classifier Configurations
-
Go to the RARE Portal.
-
Open the sidebar and select Configurations → Classifiers (Qualitative)
Understanding the Classifier List
-
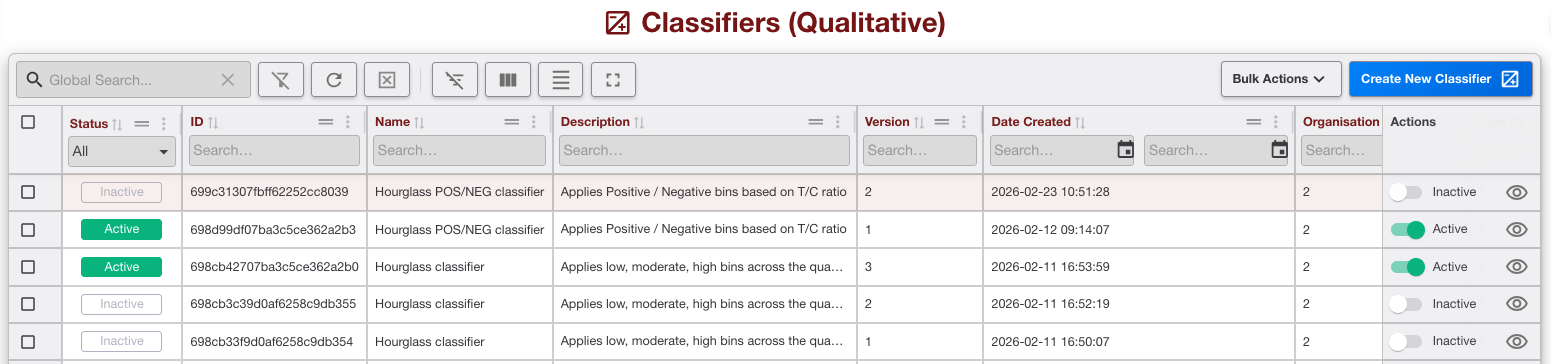
Each row shows a classifier’s name, type (binary/multi-bin), creation date, and a preview of its logic (e.g., threshold rules for each line).
-
The list includes both active and disabled configurations, with clear status indicators.
Filtering and Sorting Classifiers
Filter
-
By Name: Enter part or all of a classifier’s name to narrow the list.
-
By Description: Enter part or all of a classifier’s description to narrow the list.
Sort
-
By Creation Date: See the newest or oldest classifiers first.
Actions Available
-
View/Edit: Open a classifier to review or update its details.
-
Active/Inactive: Toggle a classifier’s status to control which rules are available for new runs.
Creating a New Qualitative Classifier
Step 1 - Describe Classifier
-
Click Create New Classifier.
-
Enter a clear, descriptive name and optional notes for traceability.

Use clear, descriptive names for classifiers to aid future searches.
Step 2 - Configure Strips and Line Thresholds
In this step, you’ll define how your classifier interprets the results for each strip in your assay. The configuration interface is organised by strip—each strip is labelled at the top, and you can add additional strips using the Add Strip button at the bottom of the section.
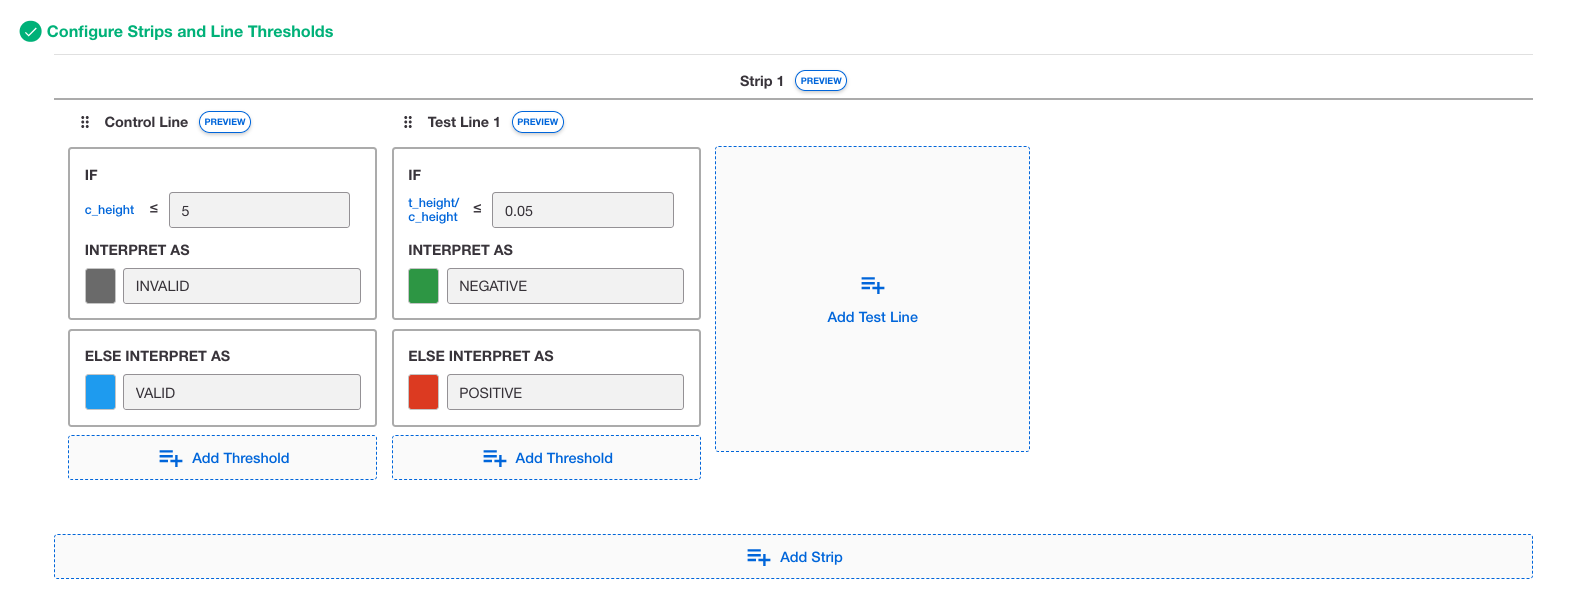
For each strip, you’ll set up:
-
Control line: Specify the signal type and threshold that determines if the strip is valid.
-
Test Lines: Configure the logic for each test line, including signal type, thresholds, and classifier type (binary or multi-bin).
This structure allows you to tailor the interpretation logic for assays with multiple strips, ensuring each one is evaluated according to its own criteria. The visual preview in the UI helps you check your logic for each strip before saving.
By configuring strips individually, you can support complex assays and maintain clear, traceable logic for every part of your test.
Control line
The control line is essential for verifying that your lateral flow assay has run correctly.
In this section, you’ll define the threshold for the control line—setting the minimum signal required for a result to be considered valid. You can choose which signal type to use in your logic: either C Height (control line peak height) or C Area (control line peak area).
This selection appears in the “if” condition, allowing you to tailor the classifier to your assay’s characteristics and validation needs.
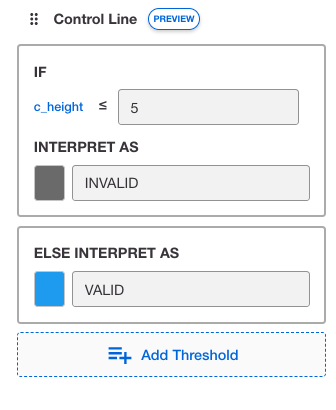
Setting both the signal type and threshold ensures that only results with a sufficiently strong control line are interpreted further. If the control line does not meet your specified criteria, the system will automatically flag the result as invalid, helping you maintain robust QC and avoid reporting unreliable outcomes.
Test Lines
Test lines are where your assay detects the presence or concentration of the target analyte. In this section, you’ll configure how each test line is evaluated by setting thresholds and choosing the signal type that best matches your assay’s design and validation requirements.
You can select from several signal types for each test line:
-
T Height (test line peak height)
-
T Height / C Height (T/C ratio)
-
T Area (test line peak area)
-
T Area / C Area (area ratio)
-
Back Calculated Conc (quantitative concentration derived from calibration)
Selecting the right signal type and threshold ensures your classifier logic reflects the scientific basis of your assay, supporting accurate and reproducible result interpretation.
Binary classifier
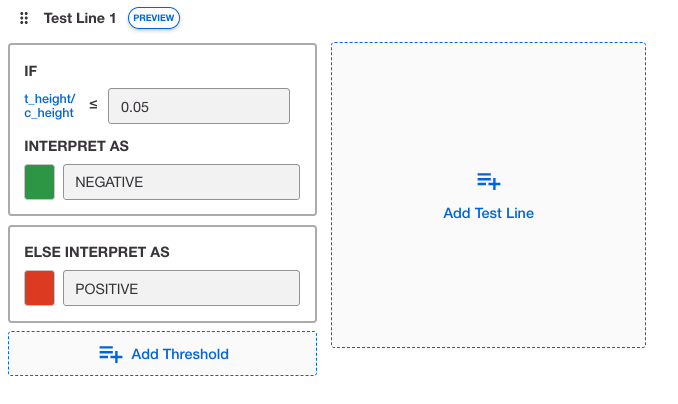
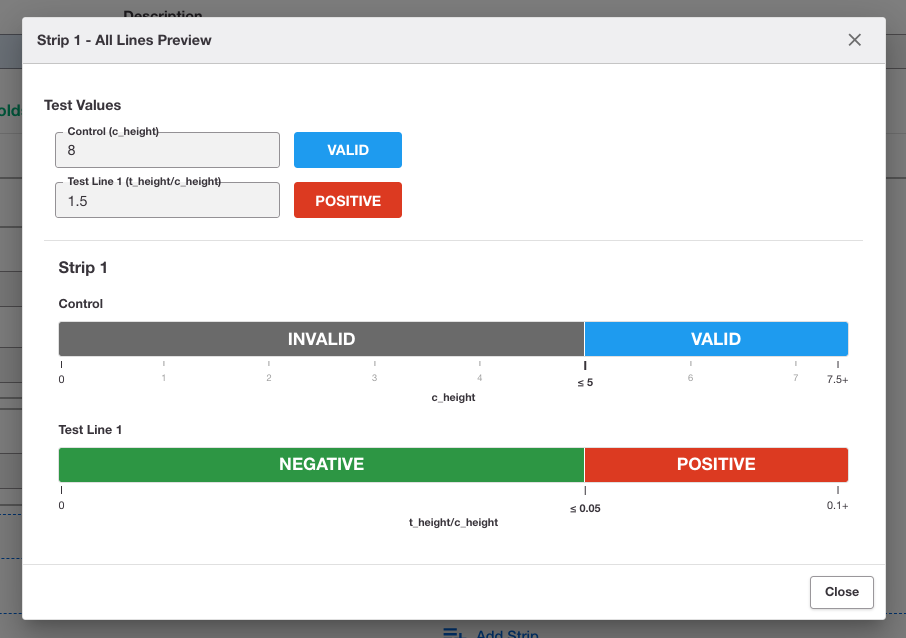
For binary classifiers, you’ll define logic that sorts results into two categories—typically “positive” or “negative.” Set a single threshold for each test line and choose the signal type (such as T Height or T/C ratio) that your assay uses to distinguish between these outcomes.
The system will apply your chosen rule to each result: if the test line signal meets or exceeds your threshold, the result is classified as positive; otherwise, it’s negative.
This approach is ideal for assays where a clear yes/no answer is required.
Multi-bin classifier
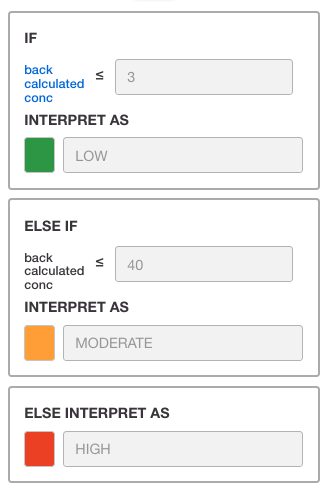
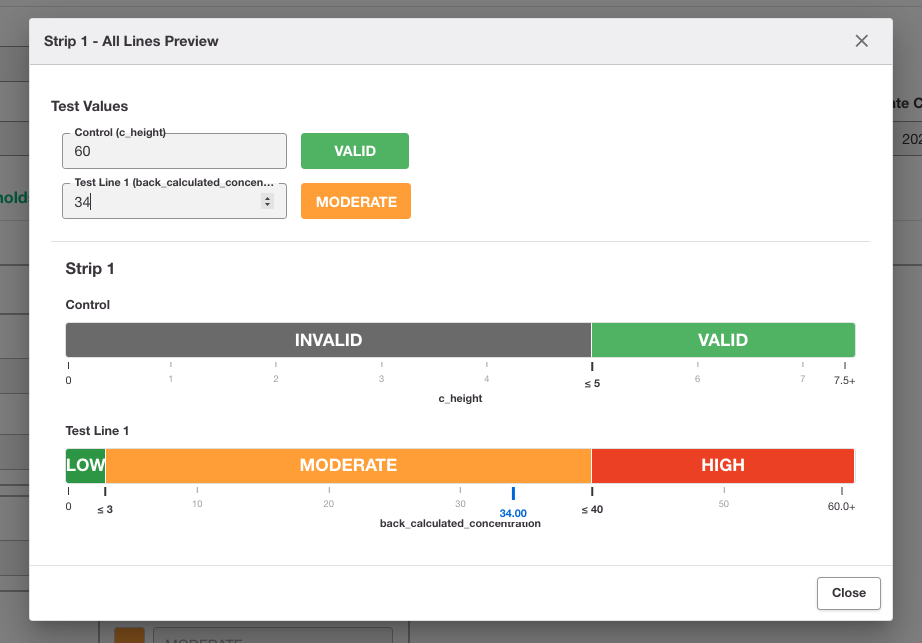
Multi-bin classifiers allow you to define more than two outcome categories (for example, “negative,” “low,” “medium,” “high”). For each test line, you’ll set multiple thresholds and select the signal type that best represents your assay’s response.
This setup lets you capture more nuanced interpretations, such as semi-quantitative results or gradations of positivity. The classifier will assign each result to the appropriate bin based on where the test line signal falls relative to your defined thresholds, supporting richer data analysis and reporting.
Step 3 - Finalise and Save
-
Review your configuration.
-
Click Save to add it to the list. The new classifier will appear with a status indicator.
Viewing and Editing an Existing Classifier
View
-
Click the Actions selector for any classifier and choose View/Edit.
-
All fields are locked as read only
Making Changes
-
To edit click Edit and save as a new version to unlock the fields
-
Update names, thresholds, or logic as needed.
-
Save changes—versioning ensures previous configurations remain traceable.
-
All edits are version-controlled. Previous versions are preserved for audit and traceability.
-
Changes to thresholds or logic do not affect results already generated with earlier configurations.
Enabling or Disabling a Classifier
-
Use the Actions selector to enable or disable a classifier.
-
Disabled classifiers cannot be used for new runs but remain available for audit/history.